How to Field Dress a Deer: A Comprehensive Guide for Hunters
Estimated reading time: 12 minutes
Table of Contents
Key Takeaways
- Timing: Field dress your deer immediately after the hunt to prevent spoilage.
- Proper Tools: Use sharp knives, game bags, and gloves for safe and efficient processing.
- Storage: Cool the meat quickly and store it in proper containers to preserve quality.
- Safety and Hygiene: Maintain cleanliness throughout the process to minimize bacterial contamination.
- Recipe Ideas: Use your harvest to prepare dishes like venison stew, grilled backstrap, or deer sausage for delicious meals.
Body Content
The Importance of Field Dressing
Field dressing your deer immediately after the hunt is not just a matter of pride; it is pivotal for ensuring meat quality, safety, and hygiene. When a deer is harvested, the warmth of its body can quickly lead to spoilage if not properly processed. According to the University of California Agriculture and Natural Resources, rapid field dressing helps maintain the meat’s quality by promoting quick cooling and preventing bacterial growth, which can lead to contamination.
Additionally, Penn State Extension emphasizes that any delay in field dressing can increase the risk of bacterial contamination. Bacteria thrive in warm, moist environments, and meat left unaddressed can deteriorate rapidly. A hunter should aim to dress the deer as soon as possible, especially on warmer days.
Moreover, understanding that temperature regulation is critical for meat preservation is essential. Cooling the carcass below 40°F (4°C) as soon as possible guarantees better meat quality and safety for consumption.
Step-by-Step Guide to Field Dressing a Deer
Step 1: Initial Cuts and Stabilization Techniques
- Preparation: Lay down a clean tarp or cloth at your work site. Have your tools ready, including a sharp knife and game bags.
- First Cut: Start your cut at the bottom of the breastbone, making a shallow incision by lifting the skin and muscle. Be cautious not to puncture any organs.
- Positioning: Tie one leg to a nearby tree or brace the carcass with rocks or logs. Proper positioning—back down, head uphill—facilitates drainage and cleanliness.
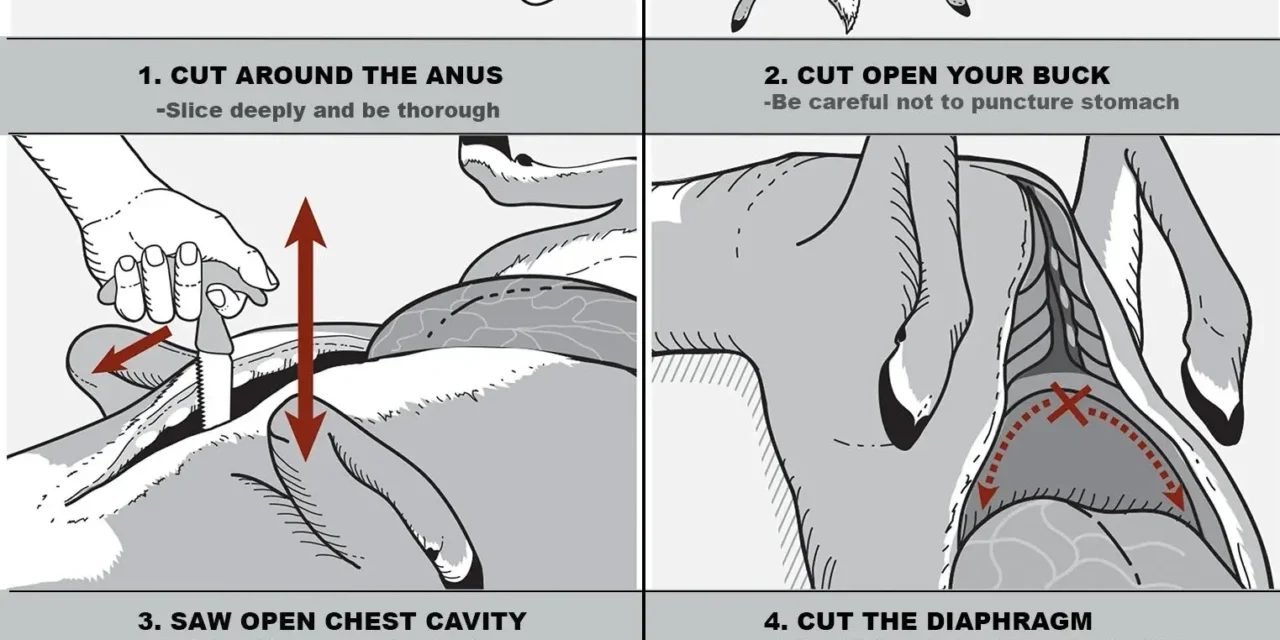
Step 2: Make Incisions to Avoid Puncturing Organs
- Midline Incision: Create a cut from the breastbone to the pelvis, following the natural line. Use your fingers in a “V” shape to guide the blade away from the entrails, reducing the risk of puncture.
- Handling: Work slowly and carefully around the organs to prevent contamination and spillage.
Step 3: Properly Remove Entrails and Reproductive Organs
- Organ Removal: Cut the diaphragm to release internal pressure and carefully slice around reproductive organs (note local regulations).
- Entail Removal: Pull the entrails out gently, keeping the meat clean and free from contamination.
Alternative Method: The Gutless Method
If processing in warm weather or packing out meat is a concern, the gutless method may be preferable:
- Cut through the leg joints to detach the front and hind quarters.
- Remove the backstraps and major meat sections without entering the abdominal cavity.
- Place the meat directly into game bags for transport.
Visual Guide
Using diagrams or images can significantly aid understanding. Displaying visual aids or referencing them during the process enhances confidence and technique.
Best Meat Processing Tools
Having the right tools will make processing safer and easier:
- Sharp Knife: A skinning knife helps with skinning and gutting.
- Bone Saw: Ideal for cutting through heavy bones.
- Game Bags: Protect and transport your meat.
- Disposable Gloves: Maintain hygiene and reduce disease risk.
- Rope and Tarp: Assist with stabilization and cleanup.
- Wipes: For cleaning knives and hands if water isn’t available.
Storing Wild Game Meat
Proper storage extends the shelf life and preserves the quality of your harvest:
Steps to Cool Meat Rapidly
- Quick Cooling: Aim to reduce internal carcass temperature below 40°F (4°C) within hours after dressing.
- Packaging: Wrap meat in game bags or clean cloth, avoiding dirt and insects during transport.
Best Practices for Freezing and Labeling
- Vacuum-Sealing: For long-term storage, consider vacuum-sealing or wrapping in freezer-safe paper, removing excess air.
- Label Clearly: Mark packages with date and meat type for easy identification.
- Temperature Control: Keep your freezer at 0°F (-18°C) or colder.
Game Meat Recipes for Your Harvest
Enjoy your freshly processed deer with these popular recipes:
Venison Stew
- Ingredients: Venison chunks, potatoes, carrots, onions, garlic, seasoning.
- Preparation: Sear meat, add vegetables and broth, and simmer until tender.
Grilled Backstrap
- Ingredients: Venison backstrap, olive oil, garlic, spices.
- Preparation: Marinate, then grill to your preferred doneness.
Deer Sausage
- Ingredients: Ground venison, pork fat, seasonings like fennel and garlic.
- Preparation: Mix and stuff into casings, then smoke or grill.
Feel free to customize recipes with your favorite spices or techniques. Sharing culinary tips with friends can enrich your hunting experience and community.
Frequently Asked Questions
How quickly should I field dress my deer after the hunt?
It is best to field dress your deer as soon as possible, ideally within an hour or two, especially in warm weather, to prevent spoilage and bacterial growth.
What are the essential tools for deer processing?
Key tools include a sharp knife, bone saw, game bags, disposable gloves, and cleaner wipes. Investing in quality tools ensures safety and efficiency.
